
***** THIS BLOG POST IS A GUEST CONTRIBUTION *****
I like to thank [Johannes J.] as a member of the Team RevvoX Community for this carefully and detailed written blog post about his laser cut DIY version of the Tonie figurines.
Enjoy his write up and give him some cheers down in the comments.
Gambrius
If you like DIY and being creative, you can create your own tonie figurines from wood with little money. Compared to their original colleagues, these are „only“ in 2D, but still look fancy and can be designed entirely according to your own ideas. In the following tutorial I show how I proceeded with the creation of own tonie figurines.
Graphic template
To find a suitable image template, the Google image search is a good source. It is recommended to search for the keyword „colouring pictures“. These are, by their simplified representation a good template for a vector drawing and the laser cut later on. Example: Google search for „coloring pictures sendung maus“.
If you found a suitable picture for the desired child figurine, you can now place it as a template in a vector program of your choice. In this example I use Adobe Illustrator. If you prefer a free alternative you should have a look at InkScape (see here). I will not go into detail of handling vector programs at this point. There are a lot of web tutorials where the basic functions and handling are explained further or take a look at this tutorial –> here.
Back in our vector program we now start to reproduce the outlines of our painting template with the path tool. The Bezier curve tool is your best friend for this step. Make sure that you create paths that are as coherent as possible (fig.: 1). If you have to create separate paths, it’s best to anchor them with points from existing paths. This is important, because later the laser has to settle down and set up again each time a new path begins. Paths that overlap too much may later have larger burn marks or burn holes.
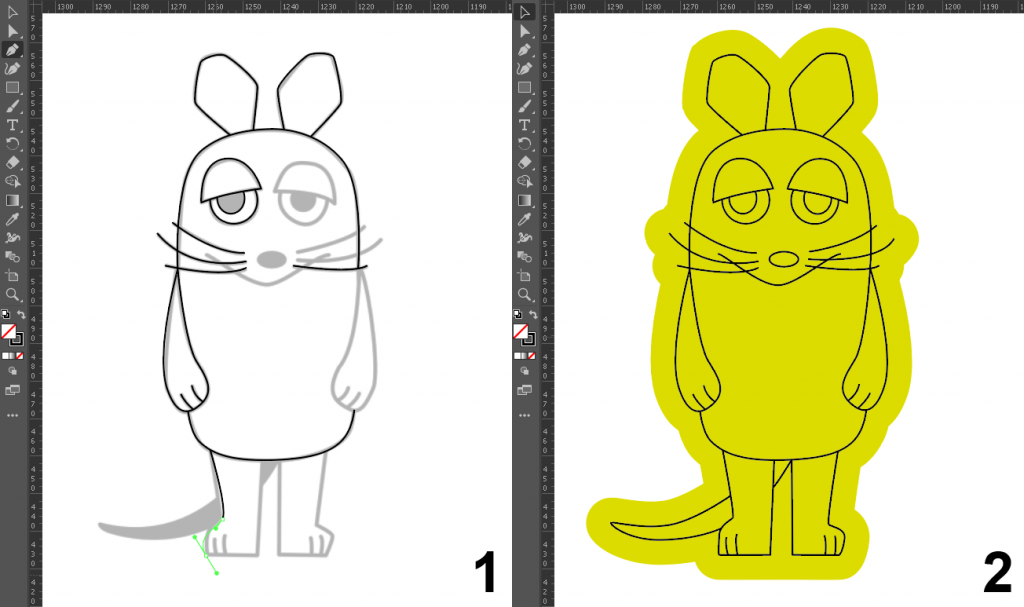
When you have finished slicing the figure you should now draw an outline. This will later define the cutting edge of your figure (fig.: 2). Either you draw the outline yourself or you copy your figure, convert it into a surface, delete all inner paths (so that only one outline remains) and scale it a little bit larger.
To enable the figure to stand on a pedestal later, it will have two „plugs“ at the bottom edge which will later be placed in the uppermost of 3 pedestal disks (fig.: 3).
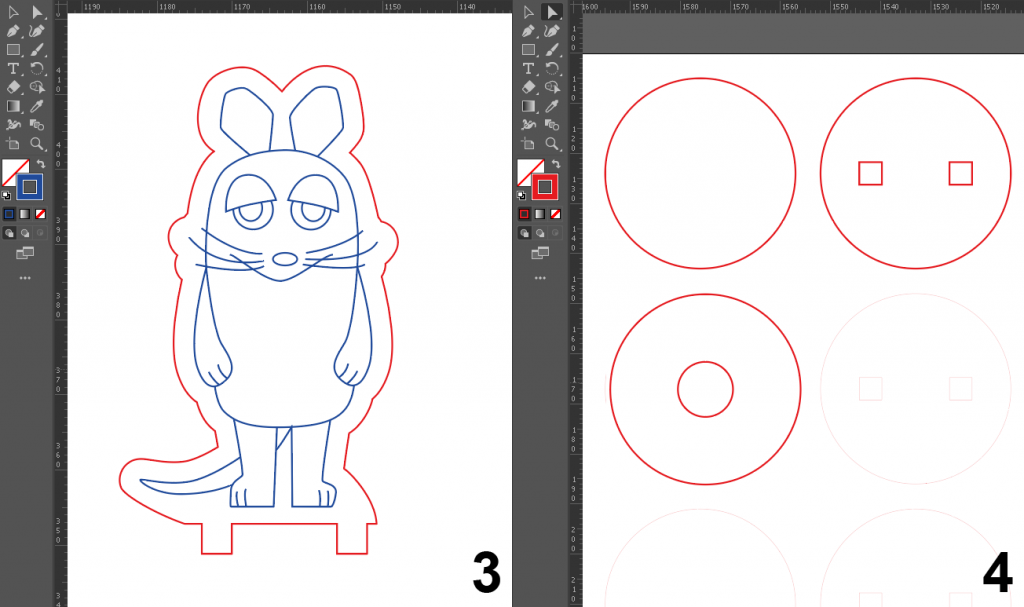
You create the base with 3 circles. In the 1st circle there are 2 additional rectangular recesses for the already mentioned connectors of your figure. The 2nd circle remains completely blank and will later serve as a support for the NFC sticker. The 3rd and last circle, however, has a round hole in the middle where a magnet will be placed later (fig.: 4).
The dimensions of the plug length and width as well as the holes for the plug and magnet depend on the thickness of the wood used for the laser cut. For this example the following sizes were used:
- Wood thickness figures: 4 mm
- Wood thickness base: 3 mm
- Connector width: 4 mm
- Connector length: 3 mm
- Plug spacing: 14 mm (18 mm from center to center)
- Base length: 40 mm
- Base hole length: 4.1 mm
- Base hole width: 4.1 mm
- Magnet hole length: 1.1 mm
Laser cut
Now only one step is missing to the finished cutting template. To be able to laser cut your figure, you have to format your path styles as follows. A laser classifies exactly 3 types of paths:
- Cutting edges: Red (RGB 255, 0, 0), path thickness 0.001 mm
- Scribes: Blue (RGB 0, 0, 255), path thickness 0.001 mm
- Engravings: Black (RGB 0, 0, 0), Whole surface
We use red cut edges for the outlines of our figure as well as for the paths of the base. The drawn contours of our figure are later scored by the laser and therefore have to be blue. All paths must have a thickness of exactly 0.001 mm (shown enlarged in the screenshots for better visibility). This sometimes leads to bad visibility of paths in our program. Don’t worry, the laser will still find them.
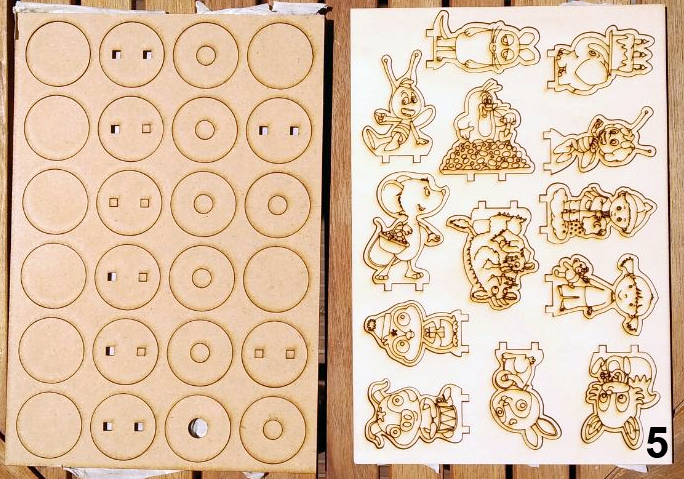
If you would like to have more than one figure cut, arrange all figures and pedestals on a drawing surface to save as much space as possible. Make sure that you leave 5 mm space between the figures and the edges of the board. This is often a minimum requirement for laser cutting.
The laser cut for the figures of this tutorial was made at Laser-Cut-Online (see here). The total cost for cutting and shipping was about 25€.
Assembly
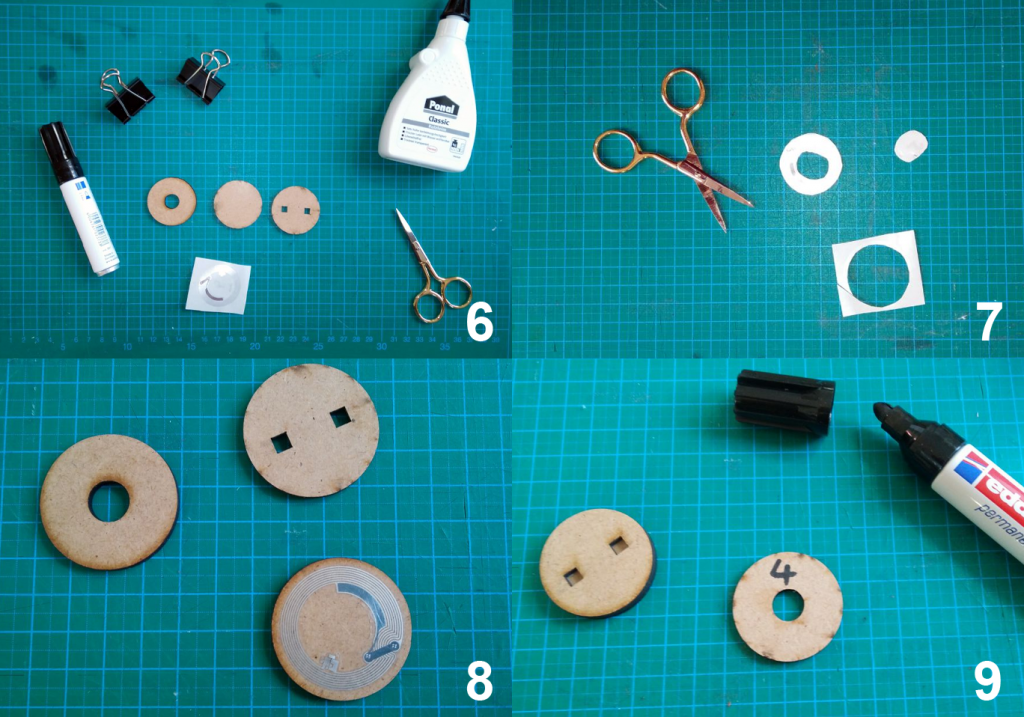
The next steps are to assemble the base and figure. For this you will need the following things (fig.: 6):
- Your cut wooden base and figure
- An NFC Tag sticker. You can get it from RFIDfriend at RFIDfriend.com. It is important that the tags are of type SLIX-L (ISO 15693). You can find out more about this in the other posts of this blog. The stickers I use have a diameter of 38 mm.
- A disc magnet. I use magnets from Magnet-Shop-Net (see here) with a length of 10 mm and a height of 3 mm (holding power 250 g).
- Craft glue for wood. I use the one from Ponal (see here). You can buy it in the hardware store or in the handicraft shop.
- A pair of scissors
- A felt-tip pen
- Clamps for fixing (optional)
First you cut the NFC sticker a little more compact. In addition, cut a hole in the middle so that you can also make contact with the discs with a little glue (Fig.: 7). Glue the sticker to the disc without holes (fig.: 8). Mark the number of the NFC tag you are using with a pen on the underside of the magnetic base disc so that you can easily identify it even after gluing it together (fig.: 9).
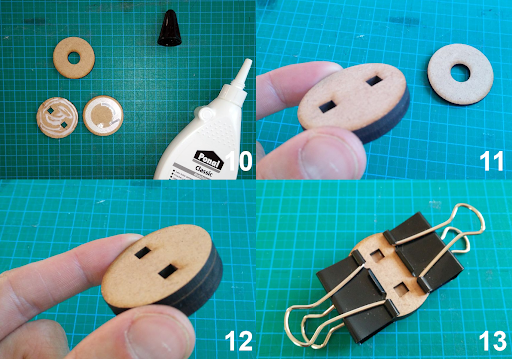
Now glue the uppermost disc with the connector holes directly onto the NFC sticker (Fig.: 10 and 11). Due to the 2 mm distance of the sticker to the edge and the cut out sticker hole in the middle, both discs have enough adhesion. Then glue the last (magnetic) disc underneath the already connected discs (Fig.: 12). Take care not to stick over the labelled side. In order to allow the wood glue to dry well and to prevent the discs from slipping, it is recommended to fix them with a clamp (Fig.: 13).
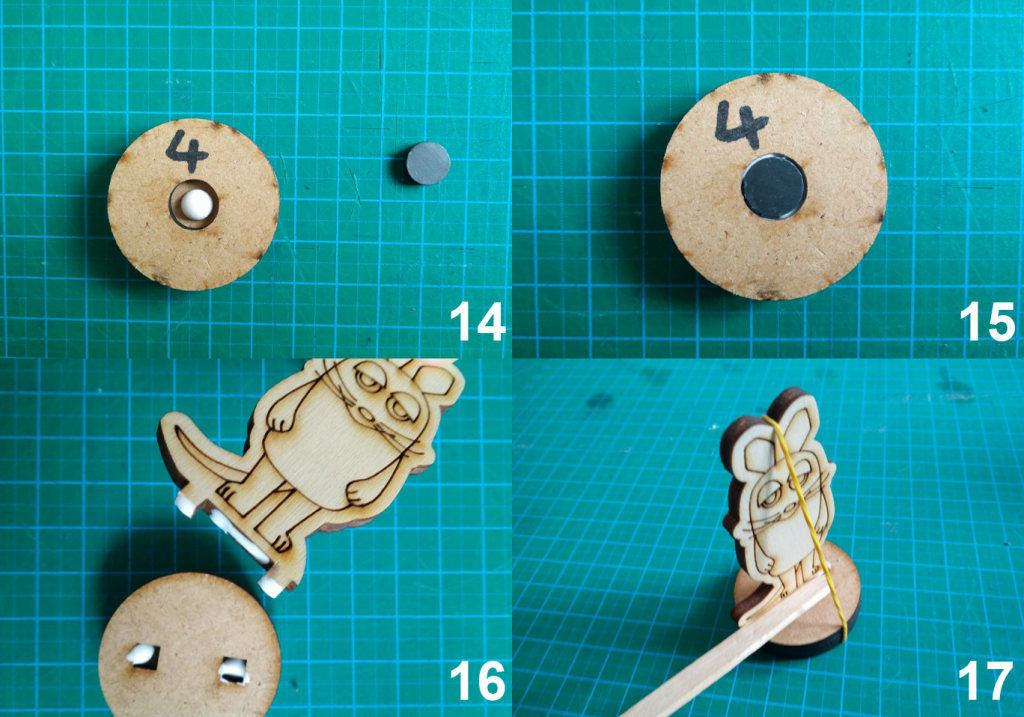
When the glue has dried, you can now insert the magnet in the existing recess with a little glue (Fig.: 14 and 15). Let the glued magnet dry first. Then you can glue your figure to the base. Feel free to use a little more glue. Depending on how precisely the base sockets have been cut, there may still be some space between plug and socket. With a little more glue you can compensate for this (fig. 16). Simply remove the excess glue with a wooden stick. Use a rubber band to fix the figure while it is drying (fig. 17). Make sure that the figure is pointing straight up and not crooked.
ATTENTION: Alternatively, you can choose not to glue the figure to the pedestal at first and then do this step after the colour design of your figure. During my work on the figures I found out that it would have been better to paint the figures first and then glue them to the socks afterwards.
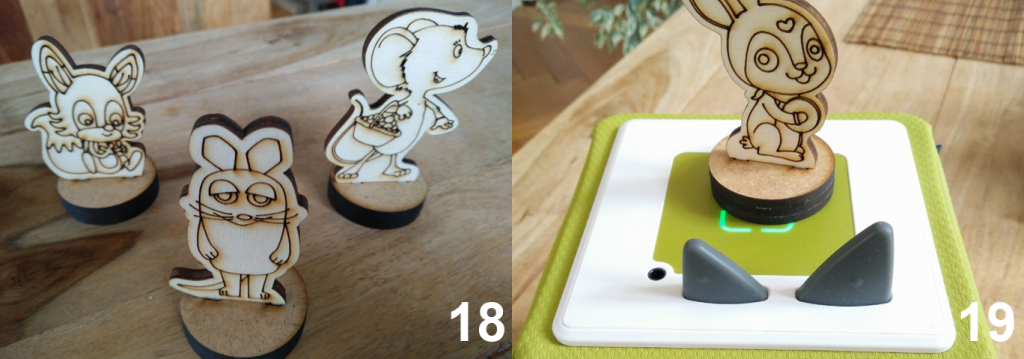
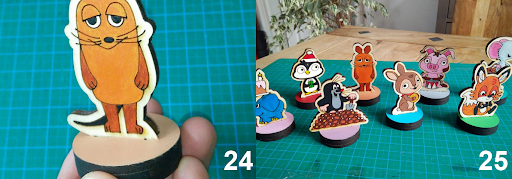
Congratulations! Now you already have your own fully functional tonie figures and can test them directly if you have already linked the NFC Tag with suitable music on your tonie box (fig.: 18 and 19). The figures are already a real eye-catcher in their natural wood look. They become even more beautiful if you colour them.
Painting
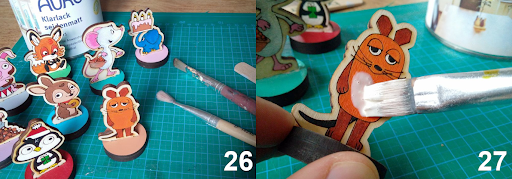
Now the most enjoying part of the work follows. The colorizing. You will need a little bit of tact for this, as the areas to be filled in are sometimes very small. Therefore it is not wrong to use large and simply structured motifs in advance when creating the graphics.
For painting you need the following things (fig.: 20):
- Very small brushes
- Acrylic colors. I use the Acrylic Colours of Amsterdamm (see here). You can get them in the handicraft shop, in the paint shop or in the hardware store.
- A painting palette
- A water glass
- Some kitchen paper
Acrylic paints are water soluble and chemically quite harmless. They are also much easier to handle than oil paints, for example. However, you are also welcome to experiment with other colours such as watercolour or felt pens. Oil or wax paints are not recommended, though.
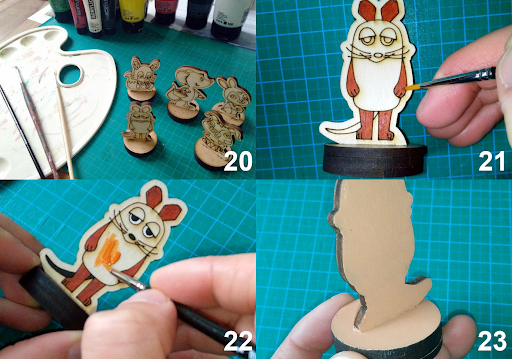
It is best to paint the smallest areas first, as the danger of a line going wrong is greatest here. You can then cover this up again with the large areas and there is less danger of painting yourself again (Fig.: 22). Which parts of the figure you paint is entirely up to you. I have decided to paint the back of the figure and the top of the base (Fig.: 23). Choose either a subtle variation of a color that is already present in the figure or a complementary variation to the main color of the figure for this parts.
Just try a little bit around and see what you like best. You don’t have to apply all colours all over the place but you can also work with colour gradations or hatching. There are no limits to your fantasy. Wonderful! Now your figures look really colourful.
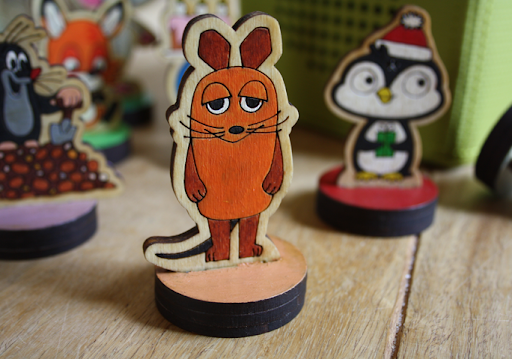
Varnishing (Optional)
If you like, you can additionally varnish your figures with lacquer paint to impregnate them and protect the colors from fading. In addition, this will seal burnt areas of the laser cut and will no longer cause black soot stains. The best is to use an eco clear coat which is suitable for children’s toys. Then it is also not so bad if the figure lands once in the mouth of your child. However, by varnishing it can happen that the colours become a little darker.
For varnishing you need the following things (fig.: 26):
- Eco clear coat. I use clear coat from Auro (see here).
- A brush
- A wooden stick
First shake or stir your varnish well. In the liquid state it usually looks milky white (fig.: 27). Only after drying does it become transparent. Now apply the varnish evenly on your figure. Don’t use too much varnish, otherwise it can happen that later ugly noses or stains remain (unfortunately this happened to me when I tried it for the first time). It is better to wipe off the excess varnish again.
It is recommended to repeat the whole process after a short drying time in a second coat, so that the paint layer becomes a little thicker. It takes at least 24 hours until the paint is dry. First I varnish the figure and after one day I varnish the base too. You can also leave the bottom side of the base unpainted, so that it sticks better to the tonie box.
Thats all folks!
Hope you enjoyed this tutorial. If you have any questions please ask in the comments. In addition I would like to hear and see how you are doing with your own creations.
Have fun!
Your Johannes J.
This is a cool project. I’m planning to insert RFID tags into Schleich figurines instead, but I’m not sure yet whether I will need magnets as well.
Hallo XOV,
Actually the Schleich figurines and the Tonie figurines are produced within the same production facility in Tunesia. The owner of these facilities (and partial owner of company Schleich) is actually one of the larger investors behind Boxine (the company that owns the Tonie brand).
The Tag within the figurines is a small Tag in size you would see usually if you chip your pet (see my detailed blog post about it). You can build these by yourself if you are skilled in small soldering and antenna winding (Blog post will follow).
But if you will use the sticker tags, you are good to go with a base plate where you put the Schleich figurine on top. In this Base you can assemble a magnet as well, like shown within the plywood figurines.
Regards,
Gambrius
Great blog, very interesting, thanks!
So, am I right in assuming that an RFID Tag similar to the ones found in Tonies would definitely be a DIY job? No way of buying them out of the box (other than taking tonies apart, of course)?
So far I’ve created my magic tonies to look exactly like real tonies, so a sticker wouldn’t really work…
Hallo Sammy,
Sorry for the news, but these are definitely just to get through DIY. Boxine gets these produced just for their needs at an indian facility.
What about a Baseplate? There are some smart CAD designs out their to house the sticker tag within the Base. You could stick your figurines right on top of these.
I am interested in your figurines. Can you share some pics? How did you produce these? If you like just get in touch with me at gambrius@gmail.com
Regards,
Gambrius
That’s a shame, but not very surprising. Are there any tutorials out there on how to make them? Doubt it’s something I could do, mind. I’m good with fiddly stuff, but my soldering skills are veeeery limited.
Regarding the figures, they nothing special. Just your bog-standard magic tonie without any baseplate. I.e. take a comansi or bullyland figure of appropriate size, drill a hole for the chip (taken from creative tonie) and drill a hole for magnet(s). Close any holes with hot glue. My kids are 3yo. They can’t tell the difference between the shop bought tonies and the „fakes“.
I like that there’s no baseplate of a „foreign“ material involed. So nothing can break/scratch.
Hi there!
How much memory needs to be on the NFC card to work as a Tonie? Thank you!
The NFC tag used for the Tonie figurines is a NXP ICODE SLIX-L RFID tag. It just has 8 Byte UID and 32 Byte Memory. That makes a total of 40 Byte.
The audio is NOT stored on the chip. It is just a „key“ to download the correct content from the cloud.
Can you share how to get it to play sound/upload it to the tonie app please
The tags / RFiD chips used within the wooden figurines are custom tags. These can be used with own content or already downloaded content that is already located within the storage of the tonie box.
These tags, custom audio and the content of the sd card can be managed with the software TeddyBench. These tags will not work with the tonie app.
Regards,
Gambrius